|
|
 |

Mechanical Designs
Mechanical gauges measure pressure or vacuum by making use of the mechanical deformation of tubes or diaphragms when exposed to a difference in pressure. Typically, one side of the element is exposed to a reference vacuum and the instrument measures the mechanical deformation that occurs when an unknown vacuum pressure is exposed to the other side.
Quartz Bourdon Tube: Similar to a standard Bourdon tube, this gauge uses a quartz helix element, but instead of moving linkages, the deformation rotates a mirror. When used for vacuum detection, two quartz Bourdon elements are formed into a helix. The reference side contains a sealed vacuum and the measurement side is connected to the unknown process vacuum. The pressure difference between the two sides causes an angular deflection that is detected optically.
The optical readout has a high resolution, about one part in 100,000. Advantages of this sensor are its precision and the corrosion resistance of quartz. Its main limitation is high price.
 |
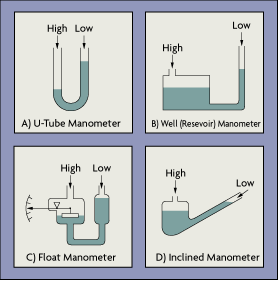
| Figure 4-5: Manometer Designs
|
Manometer: A basic manometer can consist of a reservoir filled with a liquid and a vertical tube (Figure 4-5). When detecting vacuums, the top of the column is sealed evacuated. A manometer without a reservoir is simply a U-shaped tube, with one leg sealed and evacuated and the other connected to the unknown process pressure (Figure 4-5A). The difference in the two column heights indicates the process vacuum. An inclined manometer (Figure 4-5D) can consist of a well and transparent tube mounted at an angle. A small change in vacuum pressure will cause a relatively large movement of the liquid. Manometers are simple, low cost, and can detect vacuums down to 1 millitorr.
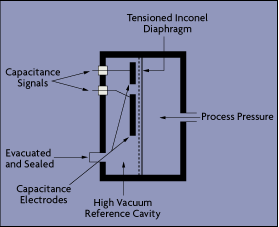
Capacitance Manometer: A capacitance sensor operates by measuring the change in electrical capacitance that results from the movement of a sensing diaphragm relative to some fixed capacitance electrodes (Figure 4-6). The higher the process vacuum, the farther it will pull the measuring diaphragm away from the fixed capacitance plates. In some designs, the diaphragm is allowed to move. In others, a variable dc voltage is applied to keep the sensor's Wheatstone bridge in a balanced condition. The amount of voltage required is directly related to the pressure.
 |
| Figure 4-6: Capacitance Vacuum Manometer
|
The great advantage of a capacitance gauge is its ability to detect extremely small diaphragm movements. Accuracy is typically 0.25 to 0.5% of reading. Thin diaphragms can measure down to 10-5 torr, while thicker diaphragms can measure in the low vacuum to atmospheric range. To cover a wide vacuum range, one can connect two or more capacitance sensing heads into a multi-range package.
The capacitance diaphragm gauge is widely used in the semiconductor industry, because its Inconel body and diaphragm are suitable for the corrosive services of this industry. They are also favored because of their high accuracy and immunity to contamination.
McLeod Gauge: Originally invented in 1878, the McLeod gauge measures the pressure of gases by compressing a known volume with a fixed pressure. The new volume is then a measure of the initial absolute pressure. Little changed since the day it was invented, the McLeod gauge has been used until recently for calibrating other gauges. It covers the vacuum range between 1 and 10-6 torr.
Molecular Momentum: This vacuum gauge is operated with a rotor that spins at a constant speed. Gas molecules in the process sample come in contact with the rotor and are propelled into the restrained cylinder. The force of impact drives the cylinder to a distance proportional to the energy transferred, which is a measure of the number of gas molecules in that space. The full scale of the instrument depends on the gas being measured. The detector has to be calibrated for each application.
Viscous Friction: At high vacuums, viscosity and friction both depend on pressure. This instrument measures vacuums down to 10-7 torr by detecting the deceleration caused by molecular friction on a ball that is spinning in a magnetic field. Vacuum is determined by measuring the length of time it takes for the ball to drop from 425 to 405 revolutions per second after drive power is turned off. The higher the vacuum, the lower the friction and therefore the more time it will take. This design is accurate to 1.5% of reading, is resistant to corrosion, and can operate at temperatures up to 7500¡ F.
Thermal Designs: The thermal conductivity of a gas changes with its pressure in the vacuum range. If an element heated by a constant power source is placed in a gas, the resulting surface temperature of the element will be a function of the surrounding vacuum. Because the sensor is an electrically heated wire, thermal vacuum sensors are often called hot wire gauges. Typically, hot wire gauges can be used to measure down to 10-3 mm Hg.
Pirani: In this design, a sensor wire is heated electrically and the pressure of the gas is determined by measuring the current needed to keep the wire at a constant temperature. The thermal conductivity of each gas is different, so the gauge has to be calibrated for the individual gas being measured. A Pirani gauge will not work to detect pressures above 1.0 torr, because, above these pressures, the thermal conductivity of the gases no longer changes with pressure. The Pirani gauge is linear in the 10-2 to 10-4 torr range. Above these pressures, output is roughly logarithmic. Pirani gauges are inexpensive, convenient, and reasonably accurate. They are 2% accurate at the calibration point and 10% accurate over the operating range.
Thermocouple: The thermocouple gauge relates the temperature of a filament in the process gas to its vacuum pressure. The filament is heated by a constant current of 20-200 mA dc, and the thermocouple generates an output of about 20 mV dc. The heater wire temperature increases as pressure is reduced.
Typical thermocouple gauges measure 1 millitorr to 2 torr. This range can be increased by use of a gauge controller with a digital/analog converter and digital processing. Using an industry standard thermocouple sensor, such a gauge controller can extend the range of a thermocouple sensor to cover from 10-3 to 1,000 torr, thereby giving it the same range as a convection-type Pirani gauge but at a lower price.
Convection Gauge: Similar to the Pirani gauge, this sensor uses a temperature-compensated, gold-plated tungsten wire to detect the cooling effects of both conduction and convection, and thereby extends the sensing range. At higher vacuums, response depends on the thermal conductivity of the gas, while at lower vacuums it depends on convective cooling by the gas molecules. Measurement range is from 10-3 to 1,000 torr. With the exception of its expanded range, features and limitations of this sensor are the same as those of Pirani and most thermocouple gauges.
Combined Gauges: To get around the range limitations of certain sensors, gauge manufacturers have devised means for electronically linking multiple sensor heads. For example, one manufacturer offers a wide-range vacuum gauge that incorporates two pressure sensors in one housing: a fast response diaphragm manometer for measurements between 1,500 torr and 2 torr, and a Pirani gauge for measuring between 2 torr and 1 millitorr. The gauge controller automatically switches between the two sensors.
Ionization Types: Ionization detectors have been available since 1916. They measure vacuum by making use of the current carried by ions formed in the gas by the impact of electrons. Two types are available: hot cathode and cold cathode.
 |
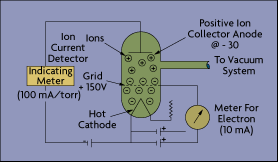
| Figure 4-7: Hot-Cathode Vacuum Gauge
|
Refined by Bayard-Alpert in 1950, the hot filament off the hot-cathode gauge emits electrons into the vacuum, where they collide with gas molecules to create ions (Figure 4-7). These positively charged ions are accelerated toward a collector where they create a current in a conventional ion gauge detector circuit. The amount of current formed is proportional to the gas density or pressure. Most hot-cathode sensors measure vacuum in the range of 10-2 to 10-10 torr.
Newer instruments extend this range significantly by using a modulated electron beam, synchronously detected to give two values for ion current. At pressures below 10-3 torr, there is little difference in the two values. At higher pressures, the ratio between the two readings increases monotonically, allowing the gauge to measure vacuums up to 1 torr.
Because most high-vacuum systems were made of glass in 1950, it made sense to enclose the electrode structure in glass. Today, however, a modern vacuum system may be made entirely of metal. One argument in favor of this is that glass decomposes during routine degassing, producing spurious sodium ions and other forms of contamination. Nevertheless, glass gauges for the time being do remain the most popular hot cathode sensors.
 |
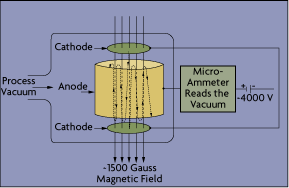
| Figure 4-8: Cold-Cathode Vacuum Gauge
|
Cold Cathode: The major difference between hot and cold cathode sensors is in their methods of electron production. In a cold cathode device, electrons are drawn from the electrode surface by a high potential field. In the Phillips design (Figure 4-8), a magnetic field around the tube deflects the electrons, causing them to spiral as they move across the magnetic field to the anode. This spiraling increases the opportunity for them to encounter and ionize the molecules. Typical measuring range is from 10-10 to 10-2 torr. The main advantages of cold cathode devices are that there are no filaments to burn out, they are unaffected by the inrush of air, and they are relatively insensitive to vibration.
| |
References and Further Reading |
| |
Omegadyne Pressure, Force, Load, Torque Databook, Omegadyne, Inc., 1996. |
| |
The Pressure, Strain, and Force Handbook, Omega Press LLC, 1996. |
| |
"Considerations In Selecting Pressure Calibrators," L. Buckon, Paper 91-0449, 1991. |
| |
"Dead Weight Pressure Measurement," G.F. Budenberg, I&CS, February, 1971. |
| |
"Keeping Up With Pressure Sensors," R. Merritt, I&CS, April, 1982. |
| |
"Strain Gages, Bonded Resistance" National Aerospace Standard 942, Revision 2, 1964. |
| |
"The Strain Gage Primer," C.C. Perry and H.R.Lisser, McGraw Hill, 1962. |
| |
Instrument Engineers' Handbook, Bela Liptak, CRC Press LLC, 1995. |
| |
"Measuring High Pressures Above 20,000 psig," R.K. Kaminski, Intech August, 1968. |
| |
Marks' Standard Handbook for Mechanical Engineers, 10th Edition, Eugene A. Avallone, and Theodore Baumeister, McGraw-Hill, 1996. |
| |
McGraw-Hill Concise Encyclopedia of Science and Technology, McGraw-Hill, 1998. |
| |
Process/Industrial Instruments and Controls Handbook, 4th Edition, Douglas M. Considine, McGraw-Hill, 1993. |
| |
Van Nostrand's Scientific Encyclopedia, Douglas M. Considine and Glenn D. Considine, Van Nostrand, 1997. |
|
