Measuring Circuits
In order
to measure strain with a
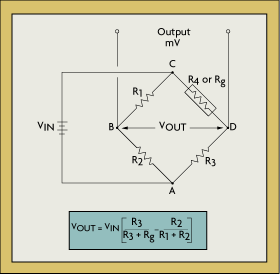
bonded resistance strain gauge, it must be connected to an electric circuit that is capable of measuring the minute changes in resistance corresponding to strain. Strain gauge transducers usually employ four strain gauge elements electrically connected to form a Wheatstone bridge circuit (Figure 2-6).
A Wheatstone bridge is a divided bridge circuit used for the measurement of static or dynamic electrical resistance. The output voltage of the Wheatstone bridge circuit is expressed in millivolts output per volt input. The Wheatstone circuit is also well suited for temperature
compensation.
The equation of the Wheatstone bridge, if R1, R2, R3, and R4 are equal, and a voltage, VIN, is applied between points A and C, then the output between points B and D will show no potential difference. However, if R4 is changed to some value which does not equal R1, R2, and R3, the bridge will become unbalanced and a voltage will exist at the output terminals. In a so-called G-bridge configuration, the variable strain sensor has resistance Rg, while the other arms are fixed value resistors.
The sensor, however, can occupy one, two, or four arms of the Wheatstone bridge, depending on the application. The total strain, or output voltage of the circuit (VOUT) is equivalent to the difference between the voltage drop across R1 and R4, or Rg. This can also be written as:
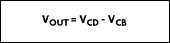
For more detail, see Figure 2-6. The bridge is considered balanced when R1/R2 = Rg/R3 and, therefore, VOUT equals zero.
Any small change in the resistance of the sensing strain gauge will throw the bridge out of balance, making it suitable for the detection of strain. When the bridge is set up so that Rg is the only active strain gauge, a small change in Rg will result in an output voltage from the bridge. If the gauge factor is GF, the strain measurement is related to the change in Rg as follows:

The number of active strain gauges that should be connected to the bridge depends on the application. For example, it may be useful to connect gauges that are on opposite sides of a beam, one in compression and the other in tension. In this arrangement, one can effectively double the bridge output for the same strain. In installations where all of the arms are connected to strain sensors, strain gauges temperature compensation is automatic, as resistance change due to temperature variations will be the same for all arms of the Wheatstone bridge.
In a four-element Wheatstone bridge, usually two gauges are wired in compression and two in tension. For example, if R1 and R3 are in tension (positive) and R2 and R4 are in compression (negative), then the output will be proportional to the sum of all the strains measured separately. For gauges located on adjacent legs, the bridge becomes unbalanced in proportion to the difference in strain. For gauges on opposite legs, the bridge balances in proportion to the sum of the strains. Whether bending strain, axial strain, shear strain, or torsional strain is being measured, the strain gauge arrangement will determine the relationship between the output and the type of strain being measured. As shown in Figure 2-6, if a positive tensile strain occurs on gauges R2 and R3, and a negative strain is experienced by gauges R1 and R4, the total output, VOUT, would be four times the
resistance of a single gauge. In this configuration the stain gauge tempeature changes are compensated.
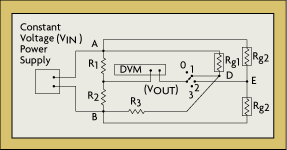
The Chevron bridge is illustrated in Figure 2-7. It is a multiple channel arrangement that serves to compensate for the changes in bridge-arm resistances by periodically switching them. Here, the four channel positions are used to switch the digital voltmeter (DVM) between G-bridge (one active gauge) and H-bridge (two active gauges) configurations. The DVM measurement device always shares the power supply and an internal H-bridge. This arrangement is most popular for strain measurements on rotating machines, where it can reduce the number of slip rings required.
Although the Wheatstone bridge circuit is one of the most popular methods of measuring electrical resistance, other methods can also be used. The main advantage of a four-wire ohm circuit is that the lead wires do not affect the measurement because the voltage is detected directly across the strain gauge element.
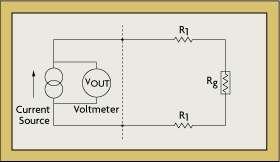
A four-wire ohm circuit installation might consist of a voltmeter, a current source, and four lead resistors, R1, in series with a gauge resistor, Rg (Figure 2-8). The voltmeter is connected to the ohms sense terminals of the DVM, and the current source is connected to the ohms source terminals of the DVM. To measure the value of strain, a low current flow (typically one milliampere) is supplied to the circuit. While the voltmeter measures the voltage drop across Rg, the absolute resistance value is computed by the multimeter from the values of current and voltage.
The measurement is usually done by first measuring the value of gauge resistance in an unstrained condition and then making a second measurement with strain applied. The difference in the measured gauge resistances divided by the unstrained resistance gives a fractional value of the strain. This value is used with the gauge factor (GF) to calculate strain.
The four-wire circuit is also suitable for automatic voltage offset compensation. The voltage is first measured when there is no current flow. This measured value is then subtracted from the voltage reading when current is flowing. The resulting voltage difference is then used to compute the gauge resistance. Because of their sensitivity, four-wire strain gauges are typically used to measure low frequency dynamic strains. When measuring higher frequency strains, the bridge output needs to be amplified. The same circuit also can be used with a semiconductor strain-gauge sensor and high speed digital voltmeter. If the DVM sensitivity is 100 microvolts, the current source is 0.44 milliamperes, the strain-gauge element resistance is 350 ohms and its gauge factor is 100, the resolution of the measurement will be
6 microstrains.
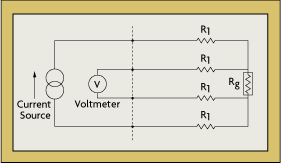
Resistance can be measured by exciting the bridge with either a constant voltage or a constant current source. Because R = V/I, if either V or I is held constant, the other will vary with the resistance. Both methods can be used.
While there is no theoretical advantage to using a constant current source (Figure 2-9) as compared to a constant voltage, in some cases the bridge output will be more linear in a constant current system. Also, if a constant current source is used, it eliminates the need to sense the voltage at the bridge; therefore, only two wires need to be connected to the strain gauge element.
The constant current circuit is most effective when dynamic strain is being measured. This is because, if a dynamic force is causing a change in the resistance of the strain gauge (Rg), one would measure the time varying component of the output (VOUT), whereas slowly changing effects such as changes in lead resistance due to temperature variations would be rejected. Using this configuration, temperature drifts become nearly negligible.
The output of a strain gauge circuit is a very low-level voltage signal requiring a sensitivity of 100 microvolts or better. The low level of the signal makes it particularly susceptible to unwanted noise from other electrical devices. Capacitive coupling caused by the lead wires' running too close to AC power cables or ground currents are potential error sources in strain measurement. Other error sources may include magnetically induced voltages when the lead wires pass through variable magnetic fields, parasitic (unwanted) contact resistances of lead wires, insulation failure, and thermocouple effects at the junction of dissimilar metals. The sum of such interferences can result in significant signal degradation.
Most electric interference and noise problems can be solved by shielding and guarding. A shield around the measurement lead wires will intercept interferences and may also reduce any errors caused by insulation degradation. Shielding also will guard the measurement from capacitive coupling. If the measurement leads are routed near electromagnetic interference sources such as transformers, twisting the leads will minimize signal degradation due to magnetic induction. By twisting the wire, the flux-induced current is inverted and the areas that the flux crosses cancel out. For industrial process applications, twisted and shielded lead wires are used almost without exception.
Guarding the instrumentation itself is just as important as shielding the wires. A guard is a sheet-metal box surrounding the analog circuitry and is connected to the shield. If ground currents flow through the strain-gauge element or its lead wires, a Wheatstone bridge circuit cannot distinguish them from the flow generated by the current source. Guarding guarantees that terminals of electrical components are at the same potential, which thereby prevents extraneous current flows.
Connecting a guard lead between the test specimen and the negative terminal of the power supply provides an additional current path around the measuring circuit. By placing a guard lead path in the path of an error-producing current, all of the elements involved (i.e., floating power supply, strain gauge, all other measuring equipment) will be at the same potential as the test specimen. By using twisted and shielded lead wires and integrating DVMs with guarding, common mode noise error can virtually be eliminated.
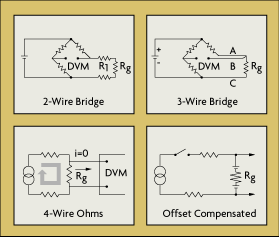
Strain gauges are sometimes mounted at a distance from the measuring equipment. This increases the possibility of errors due to temperature variations, lead desensitization, and lead-wire resistance changes. In a two-wire installation (Figure 2-10A), the two leads are in series with the strain-gauge element, and any change in the lead-wire resistance (R1) will be indistinguishable from changes in the resistance of the strain gauge (Rg).
To correct for lead-wire effects, an additional, third lead can be introduced to the top arm of the bridge, as shown in Figure 2-10B. In this configuration, wire C acts as a sense lead with no current flowing in it, and wires A and B are in opposite legs of the bridge. This is the minimum acceptable method of wiring strain gauges to a bridge to cancel at least part of the effect of extension wire errors. Theoretically, if the lead wires to the sensor have the same nominal resistance, the same temperature coefficient, and are maintained at the same temperature, full compensation is obtained. In reality, wires are manufactured to a tolerance of about 10%, and three-wire installation does not completely eliminate two-wire errors, but it does reduce them by an order of magnitude. If further improvement is desired, four-wire and offset-compensated installations (Figures 2-10C and 2-10D) should be considered.
In two-wire installations, the error introduced by lead-wire resistance is a function of the resistance ratio R1/Rg. The lead error is usually not significant if the lead-wire resistance (R1) is small in comparison to the gauge resistance (Rg), but if the lead-wire resistance exceeds 0.1% of the nominal gauge resistance, this source of error becomes significant. Therefore, in industrial applications, lead-wire lengths should be minimized or eliminated by locating the transmitter directly at the sensor.
Strain-sensing materials, such as copper, change their internal structure at high temperatures. Temperature can alter not only the properties of a strain gauge element, but also can alter the properties of the base material to which the strain gauge is attached. Differences in expansion coefficients between the gauge and base materials may cause dimensional changes in the sensor element. Therefore, a emperature compensation circuit would be needed.
Expansion or contraction of the strain-gauge element and/or the base material introduces errors that are difficult to correct. For example, a change in the resistivity or in the temperature coefficient of resistance of the strain gauge element changes the zero reference used to calibrate the unit.
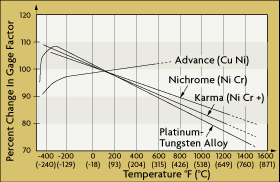
The gauge factor is the strain sensitivity of the sensor. The manufacturer should always supply data on the temperature sensitivity of the gauge factor. Figure 2-11 shows the variation in gauge factors of the various strain gauge materials as a function of operating temperature. Copper-nickel alloys such as Advance have gauge factors that are relatively sensitive to operating temperature variations, making them the most popular choice for strain gauge materials.
 CLOSE
CLOSE