The manufacturer of the radiation thermometer selects the detector and optical elements to yield the optimum compromise based upon the conflicting parameters of cost, accuracy, speed of response, and usable temperature range. The user should be cognizant of how the different detectors and optical elements affect the range of wavelengths over which a thermometer responds. The spectral response of a pyrometer will determine whether a usable measurement is possible, given the presence of atmospheric absorption, or reflections from other objects, or trying to measure the temperature of materials like glass or plastics.
Detectors
Thermal, photon, and pyroelectric detectors are typically used in radiation pyrometers. Radiation detectors are strongly affected by ambient temperature changes. High accuracy requires compensation for this ambient drift.
The responsivity of a radiation detector may be specified in terms of either the intensity of radiation, or the total radiant power incident upon the detector.
When the image formed by the target surface area is larger than the exposed area of the detector, the entire detector surface is subjected to a radiation intensity proportional to the brightness of the target. The total radiant power absorbed by the detector then depends on the area of its sensitive surface. The actual size of the effective target area is determined by the magnification of the optical system. Sensitivity typically is not uniform over the surface of a detector, but this has no effect if the target brightness is uniform. If substantial temperature differences occur on the target surface within the patch imaged on the detector, an ambiguously weighted average will result.
In the case of total radiant power, the area of the target surface imaged on the detector is limited by a stop optically conjugate to the detector. This area can be made arbitrarily small. As a result, local temperatures can be measured on the target body surface. The responsivity of the detector may depend on the location of this target source image on the detector surface. Constancy of calibration will depend on maintaining the element in a fixed position with respect to the optical system.
Thermal detectors are the most commonly used radiation thermometer detectors. Thermal detectors generate an output because they are heated by the energy they absorb. These detectors have lower sensitivity compared to other detector types, and their outputs are less affected by changes in the radiated wavelengths. The speed of response of thermal detectors is limited by their mass.
Thermal detectors are blackened so that they will respond to radiation over a wide spectrum (broadband detectors). They are relatively slow, because they must reach thermal equilibrium whenever the target temperature changes. They can have time constants of a second or more, although deposited detectors respond much faster.
A thermopile consists of one or more thermocouples in series, usually arranged in a radial pattern so the hot junctions form a small circle, and the cold junctions are maintained at the local ambient temperature. Advanced thin film thermopiles achieve response times in the 10 to 15 millisecond range. Thermopiles also increase the output signal strength and are the best choice for broadband thermometers. Ambient temperature compensation is required when thermopile detectors are used. A thermostatically controlled thermometer housing is used to avoid ambient temperature fluctuations for low temperature work. Self-powered infrared thermocouples are covered in the chapter beginning on p. 38.
Bolometers are essentially resistance thermometers arranged for response to radiation. A sensing element with a thermistor, metal film, or metal wire transducer is often called a bolometer.
Photon detectors release electric charges in response to incident radiation. In lead sulfide and lead selenide detectors, the release of charge is measured as a change in resistance. In silicon, germanium, and indium antimonide, the release of charge is measured as a voltage output.
Photon detectors have a maximum wavelength beyond which they will not respond. The peak response is usually at a wavelength a little shorter than the cutoff wavelength. Many radiation thermometers use photon detectors rather than thermal detectors, even though they measure over a narrower band of wavelength. This is because within the range of useful wavelengths, the photon detectors have a sensitivity 1000 to 100,000 times that of the thermal detector. Response time of these detectors is in microseconds. They are instable at longer wavelengths and higher temperatures. They are often used in narrow band thermometers, or broadband thermometers at medium temperatures (200 to 800°F/93 to 427°C), and often provided with cooling.

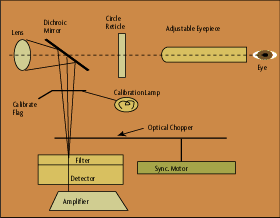
Pyroelectric detectors change surface charge in response to received radiation. The detector need not reach thermal equilibrium when the target temperature changes, since it responds to changes in incoming radiation. The incoming radiation must be chopped, and the detector output cannot be used directly. A chopper is a rotating or oscillating shutter employed to provide AC rather than DC output from the sensor. Relatively weak AC signals are more conveniently handled by conditioning circuitry. The detector change can be likened to a change in charge of a capacitor, which must be read with a high impedance circuit. Pyroelectric detectors have radiation absorbent coatings so they can be broadband detectors. Response can be restricted by selecting the coating material with appropriate characteristics.
Photon and pyroelectric detectors have thermal drift that can be overcome by temperature compensation (thermistor) circuitry, temperature regulation, auto null circuitry, chopping, and isothermal protection.
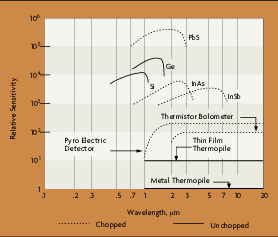
Figure 3-10 shows the different sensitivity for various radiation detectors. PbS has the greatest sensitivity, and the thermopile the least.
Optical Systems
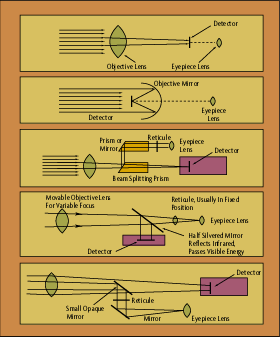
As shown in Figure 3-11, the optical system of a radiation pyrometer may be composed of lenses, mirrors, or combinations of both. Mirror systems do not generally determine the spectral response of the instrument, as the reflectivity is not dependent on wavelength over the range used for industrial temperature measurement. A mirror system must be protected from dirt and damage by a window. Copper, silver and gold are the best materials for mirrors in the infrared range. Silver and copper surfaces should be protected against tarnish by a protective film.

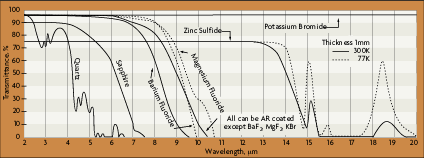
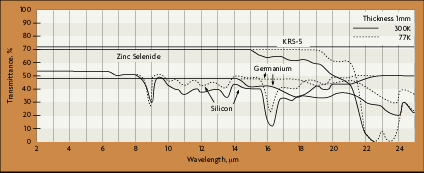
The characteristics of the window material will affect the band of wavelengths over which the thermometer will respond. Glass does not transmit well beyond 2.5 microns, and is suited only for higher temperatures. Quartz (fused silica) transmits to 4 microns, crystalline calcium fluoride to 10 microns, germanium and zinc sulfide can transmit into the 8 to 14 micron range. More expensive materials will increase the transmission capability even more, as shown in Figure 3-12.
Windows and filters, placed in front of or behind the optical system, and which are opaque outside a given wavelength range, can alter the transmission properties greatly, and prevent unwanted wavelengths from reaching the detector.

Mirror systems are generally used in fixed focus optical instruments. Varying the focus of the instrument requires moving parts, which is less complicated in a lens system. The selection of lens and window material is a compromise between the optical and physical properties of the material, and the desired wavelength response of the instrument. The essential design characteristics of materials suitable for lenses, prisms, and windows include approximate reflection loss, and short and long wavelength cut-offs. Figure 3-13 shows the transmittance of some common materials as a function of wavelength. Chemical and physical properties may dictate choice of material to meet given operating conditions.

The aberrations present in a single lens system may not permit precise image formation on the detector. A corrected lens, comprised of two or more elements of different material, may be required.
The physical shape of the optical system, and its mounting in the housing, controls the sighting path. For many designs, the optical system is aligned to surface and measures surface temperature. This is satisfactory for sizable targets. Visual aiming accessories may be required for sighting very small targets, or for sighting distant targets. A variety of aiming techniques are available which include: simple bead and groove gun sights, integrated or detachable optical viewing finders, through-lens sighting, and integrated or detachable light beam markers.
Field of View
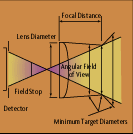
The field of view of a radiation thermometer essentially defines the size of the target at a specified distance from the instrument. Field of view can be stated in the form of a diagram (Figure 3-14), a table of target sizes versus distance, as the target size at the focal distance, or as an angular field of view.

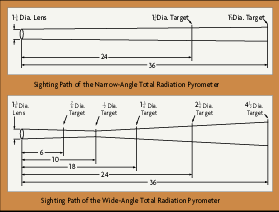
Figure 3-15 shows typical wide angle and narrow angle fields of view. With a wide angle field of view, target size requirements neck down to a minimum at the focal distance. The narrow angle field of view flares out more slowly. In either case, cross sectional area can vary from circular, to rectangular, to slit shaped, depending on the apertures used in the thermometer optics system.

Telescopic eyepieces on some designs can magnify the radiant energy so smaller targets can be viewed at greater distances. Targets as small as 1/16 inch in diameter are measurable using the correct thermometer design. A common optics system will produce a 1-inch diameter target size at a 15-inch working distance. Other optical systems vary from small spot (0.030 inch) for close up, pinpoint measurement, to distant optics that create a 3-inch diameter target size at 30 feet. The angle of viewing also affects the target size and shape.
In calibrating a radiation thermometer, the radiation source must completely fill the field of view in order to check the calibration output. If the field of view is not filled, the thermometer will read low. If a thermometer does not have a well defined field of view, the output of the instrument will increase if the object of measurement is larger than the minimum size.

The image of the field stop at the focal distance for most thermometers is larger than the diameter of the field stop. Between the focal distance, the field of view is determined by the lens diameter and the image diameter. Lines drawn from the image, at the focal distance, to the lens diameter enclose the field of view. Beyond the focal distance, the field of view is determined by rays extending from the extremities of the lens diameter through the extremities of the image at the focal distance.
In practice, any statement of field of view is only an approximation because of spherical and chromatic aberration. Spherical aberration is caused by the fact that rays hitting the lens remote from its axis are bent more than rays passing the lens near its axis. A circular field stop is imaged as a circle with a halo around it. Mirrors also have spherical aberration.
Chromatic aberration occurs because the refractive index of optical materials changes with wavelength, with the refractive index lower at shorter wavelengths. This means rays of shorter wavelength are bent more and focus nearer the lens, while rays of longer wavelength are focused farther from the lens. The image of a field stop over a band of wavelengths is hence a fuzzy image.
Fuzziness of the field of view can also be caused by imperfections in the optical material, and reflections from internal parts of the thermometer. Quality materials, and blackening of inside surfaces reduce these latter effects.

Some manufacturers state a field of view that includes effects of aberrations, and some do not. If the target size and stated field of view are nearly the same, it may be wise to determine the field of view experimentally. Sight the thermometer on a target that gives a steady, uniform source of radiation. At the focal distance, interpose a series of apertures of different diameter. Plot the thermometer output versus the aperture area. The output of the thermometer should increase proportional to the aperture area for aperture areas less than the nominal target area. The output should increase only minimally for increasing areas, above the nominal target area. Increases of a few tenths of a percent in output for each doubling of the aperture area indicates the nominal field of view takes into account the effects of aberrations. If these are not taken into account, the thermometer output may show significant increases in output as the viewable target area is increased above the nominal value.
Electronics
The calibration curves of detector output versus temperature of all detectors is non-linear because the equations relating the amount of radiation emitted by an object are power functions. The radiation thermometer electronics must amplify, regulate, linearize and convert this signal to an mV or mA output proportional to temperature.
Before microprocessors, the advantage of high N values was offset by the fact that the useful range of temperature measurement with an instrument of fixed span was very low. For example, for N=15, an instrument reading 100% of scale at 1000* C would read approximately 820°C at 10% of full scale. If the target temperature were expected to fall outside this narrow band, linearization or range switching was necessary. Today, microprocessors easily permit such signals to be linearized very cost effectively.
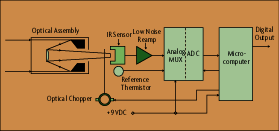
Microprocessor-based electronics (Figure 3-16) are superior to conventional analog electronics because in situ computing can be used to correct detector imperfections, provide emissivity compensation, and provide digital outputs for two way communications between the thermometer and a PC or a control system workstation.
Many of the shortcomings of thermal type detectors can be handled by sophisticated data processing techniques available in digital computers. The target temperature is an exponential function of the detector temperature. The output signal from the detector is a small voltage proportional to the difference in temperature between the target and the detector itself. To get the target temperature, it is necessary to accurately measure the detector temperature. Detector body temperatures span the range of the environment, from -50 to 100°C. Over this range, the most precise and accurate temperature transducer is the thermistor. However, thermistor outputs are highly non-linear and vary widely from unit to unit. Analog devices must abandon use of the thermistor for a less accurate and easier to use element, such as an integrated circuit, which has a linear output. But highly non-linear responses are no problem for a computer, and units with microprocessors can employ thermistors.
Detector responsivity is also a non-linear function of the detector body temperature. It is typically grossly corrected in analog devices with a simple linear gain correction produced by a temperature sensitive resistor in the preamplifier feedback network. A microprocessor can use a complex algorithm for the detection body temperature to correct for changes in detector responsivity.

The net radiant target signal power impinging on the detector is highly non-linear with the target temperature, and for temperatures under 1000°F, it is also dependent on the detector temperature itself. Again, a microprocessor can make accurate compensation for both these effects.
There is a fourth power relationship between the detector output voltage and target temperature. Analog devices typically use linear approximation techniques to characterize this relationship. A computer can solve, in real time, a complex algorithm, with as many as seven terms, instead of linear approximation, for higher accuracy.
Detector zero drift due to ambient temperature conditions can also be corrected using a microprocessor. This avoids errors of several degrees when you move an instrument from one room to another having a different temperature.
Precise emissivity corrections can be called up, either from as many as 10 values stored in EEPROM, or from a complex real-time algorithm dependent on target time-temperature relationships. An example is a program to compensate for the emissivity of a piece of steel, which oxidizes as it heats to higher temperatures.
Preprocessing by an onboard microprocessor may allow extraction of only the pertinent data needed by control systems. For example, only out of range data, determined by setpoints programmed into the microprocessor, may be desired for data transmission. This data can be transmitted digitally, on a priority interrupt basis. This is more efficient than having the user transmit all measured data to the host system, only to have the pertinent information sorted there.
An intelligent radiation thermometer can be programmed to run preprogrammed internal calibration procedures during gaps, or windows in measurement activity.
This prevents internal calibration checks from taking the device off-line at a critical moment in the process. A thermometer reading the temperature of cans on a conveyor belt can run an internal calibration program whenever a gap between successive cans is sensed.
An internal microprocessor can also perform external control functions on external loop elements, using contact closure or relay outputs provided as options, and based on the incoming temperature data. In addition, intelligent devices can accept auxiliary inputs from thermocouples, RTDs or other radiation thermometers, and then use this data to support internal functions. For example, a high temperature setpoint could be continuously, and automatically reset by the microprocessor in response to input variable history.
A sample-and-hold function is useful when a selected event serves to trigger the temperature measurement of an object. The thermometer measures temperature at that instant, disregarding earlier or later measurements. Analog circuitry exhibited a slow drift of the measurement during the hold period, but modern digital instruments hold the value without degradation for indefinite periods.
Sometimes, the highest temperature within the field of view is of interest during a given period. Intelligent electronics can be programmed to store into memory the highest temperature it saw in a sampling period. This is called peak picking. Valley picking, when the lowest temperature measured over a given period is of interest, also is possible.
Averaging is used to prevent rapid excursions of the object temperature from the average value from causing noise in the control system. A common way to accomplish this is to slow down the response of the instrument via software in the microprocessor-based electronics.
Construction
Figure 3-11, p. 33, illustrates the common types of construction found in industrial radiation thermometers. The constructions in (a) and (b) are typical of instruments using detectors that give a stable DC millivolt output without preamplification such as thermopiles and silicon cells. The construction in (a) has also been used for detectors whose DC drift demands that they be used in an AC mode.
A spinning disk or vibrating reed is interposed between the lens and the detector to cyclically interrupt the radiation. Thus the detector sees pulses of radiation. The output of the detector is AC. The detector package must be small enough so that it doesn't interfere with optical sighting to the target.
The constructions in (c), (d), and (e) are useful when the detector package is too large to permit sighting around it. Optical chopping between the lens and the detector is common in these constructions. The back surface of the chopping disk, or blade, may serve as a local ambient temperature reference. The detector alternately sees the target and the modulating device, which is at local ambient temperature.
In some designs, a local hot source, or hot surface, may be maintained at a known reference temperature. The detector alternately sees the target and the reference source. The resulting AC signal can then be calibrated in terms of the unknown target temperature.
In ratio thermometers, the filters that define the pass band of the two radiation signals that are ratioed may be on the chopping disc.
Figure 3-17 illustrates a portable radiation thermometer for spot measurement of the temperature of a surface. Radiation from the target is multiply reflected from the hemispherical mirror shown. A detector receives this radiation through a small opening in the reflector. The radiation multiply reflected between the mirror and target appears to the detector to be from a blackbody. A commercial pyrometer using this technique can read the temperature of targets with emissivity as low as 0.6 without correction. The reflector must be placed close to the surface being measured to eliminate extraneous radiation and prevent losses. It can only be used for short time durations because heating of the reflector will affect the measurement accuracy. In addition, the energy reflected back to the target surface may cause its temperature to change.
 CLOSE
CLOSE

